
Muse Image is now available to developers on Meta Model API and priced for production volumes at $0.01/image. While the model has been enabling creative experiences in Meta AI since July, this is the first time developers can call it directly for their workflows.
As a reasoning model, Muse Image thinks and plans before generating and editing images. It looks at what is in each input frame and maps out the full layout before drawing anything: what goes where, how many parts there are, and how they relate. That is what lets one rich prompt return a composed, structured result instead of a loose collage and is why you can decompose, annotate and revise specific parts of an image in a single call.
In this guide, we'll show you how to put those capabilities to work through the three primitives that every image workflow builds on, as well as the steps to leverage Muse Image's anchored composition and multi-refinement capabilities:
Some of the model's most useful behavior is something we never even designed: within its chain of thought, Muse Image reflects on its own drafts and improves them. That might mean a local edit when a small detail is off, a full regeneration when larger parts are wrong or even a switch to tool use when factual accuracy is at stake. This behavior emerged on its own during training, simply because self-refinement produced better images and therefore a higher reward.
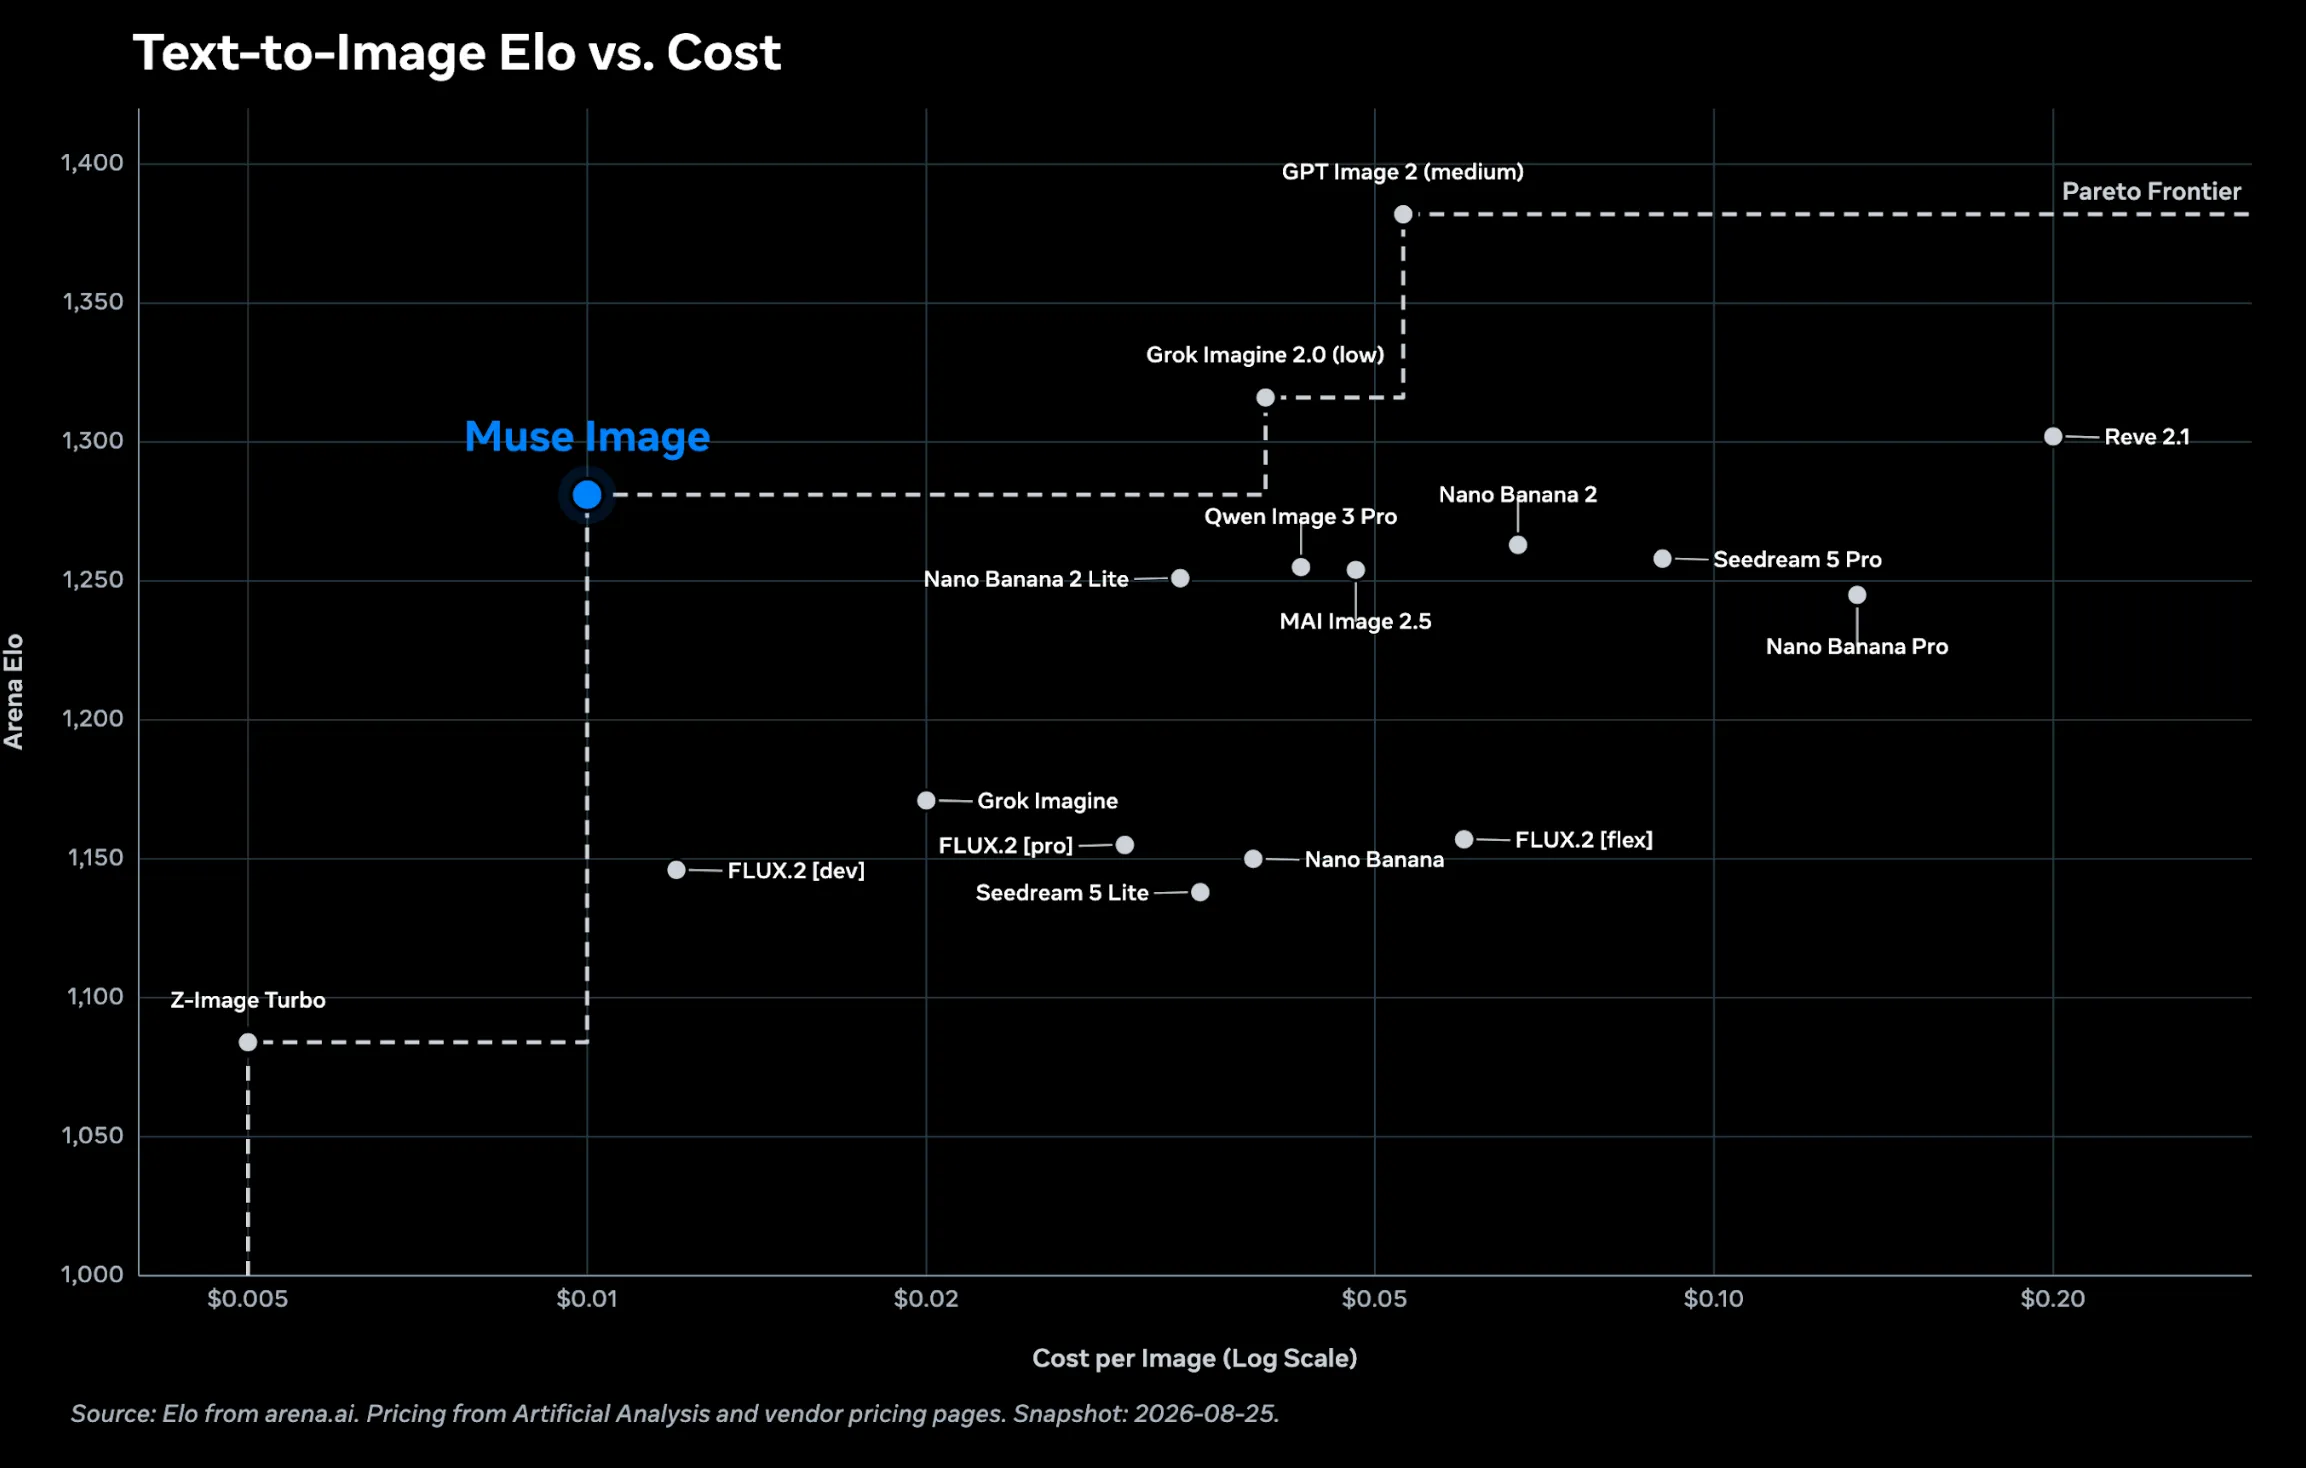
What this means in practice, is a model that competes with the best and priced for production volumes at $0.01/image:
For more details on the model and its research foundations, please see the Muse Image post on the AI at Meta blog.

First, you'll need to head to dev.meta.ai to access Meta Model API and to generate an API key. Model API exposes three primitives that most image workloads build on: generate an image from text, edit an existing image, and compose several inputs into one scene.
You reach Muse Image through the single-shot images endpoints, which mirror the OpenAI Images API:
POST /v1/images/generations: text-to-image.POST /v1/images/edits: image-to-image and editing (including multi-image composition).Four things worth knowing before you start generating:
Install the dependencies and set your key:
shellpip install openai requestsexport MODEL_API_KEY="LLM|..."
The endpoints mirror the OpenAI Images API, so if you already have an OpenAI client, point base_url at Meta Model API and keep the code you have:
pythonimport base64import osfrom openai import OpenAI# The OpenAI SDK does not auto-read MODEL_API_KEY, so pass it explicitly.client = OpenAI(base_url="https://api.meta.ai/v1",api_key=os.environ["MODEL_API_KEY"],)def save_image(b64: str, path: str) -> None:"""Decode a base64 image from the API and write it to disk."""with open(path, "wb") as f:f.write(base64.b64decode(b64))print(f"saved {path}")
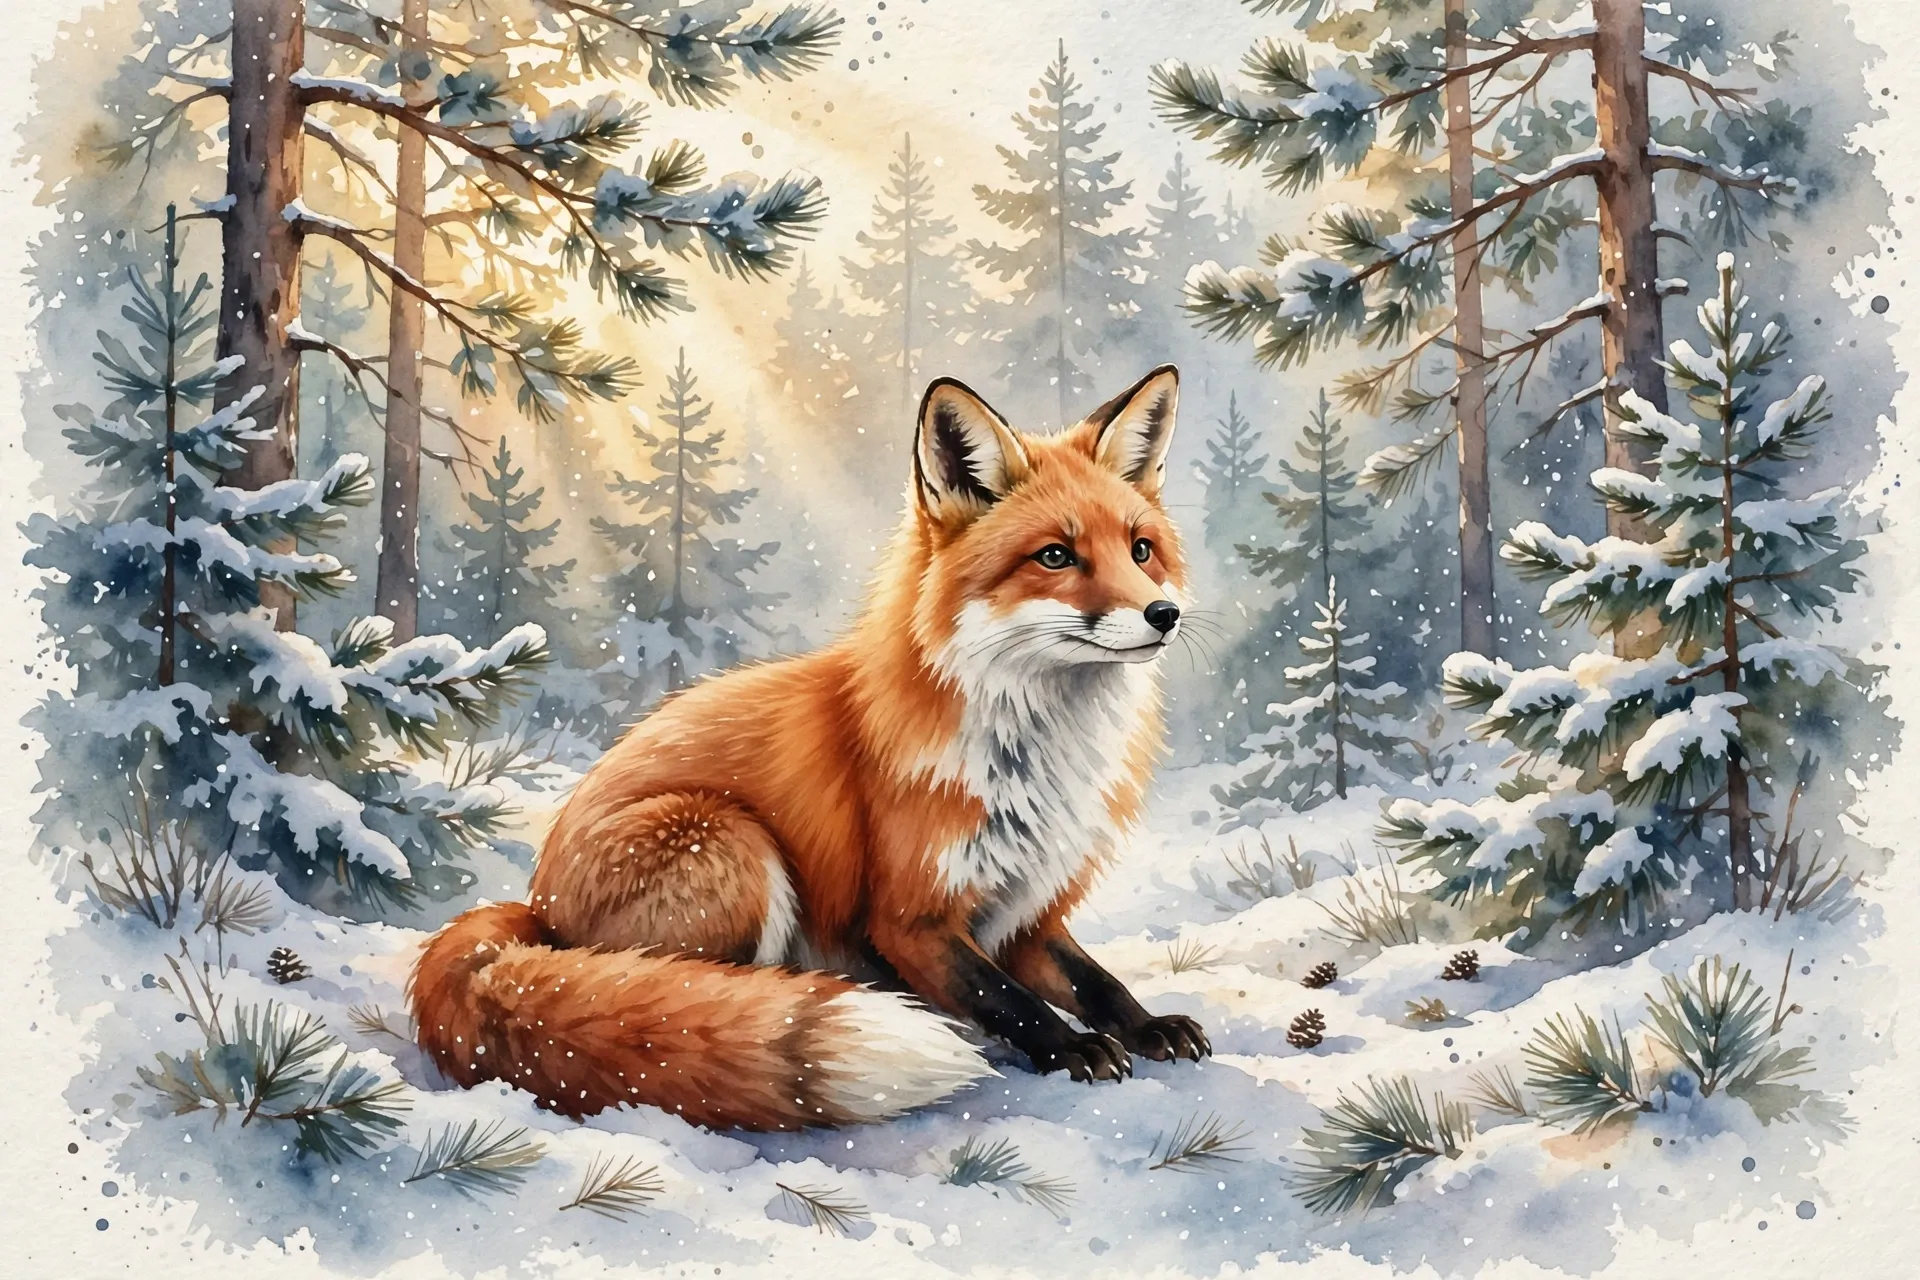
Text-to-image is the base primitive: a prompt in, generated image bytes out. Call images.generate with a model and a prompt. The response data list holds one image per result; decode b64_json to get the bytes. The example below renders a watercolor fox.
pythonresponse = client.images.generate(model="muse-image-1.0",prompt=("a watercolor painting of a red fox sitting in a snowy pine forest, ""soft golden morning light"),n=1,)save_image(response.data[0].b64_json, "fox.webp")print("usage:", response.usage)
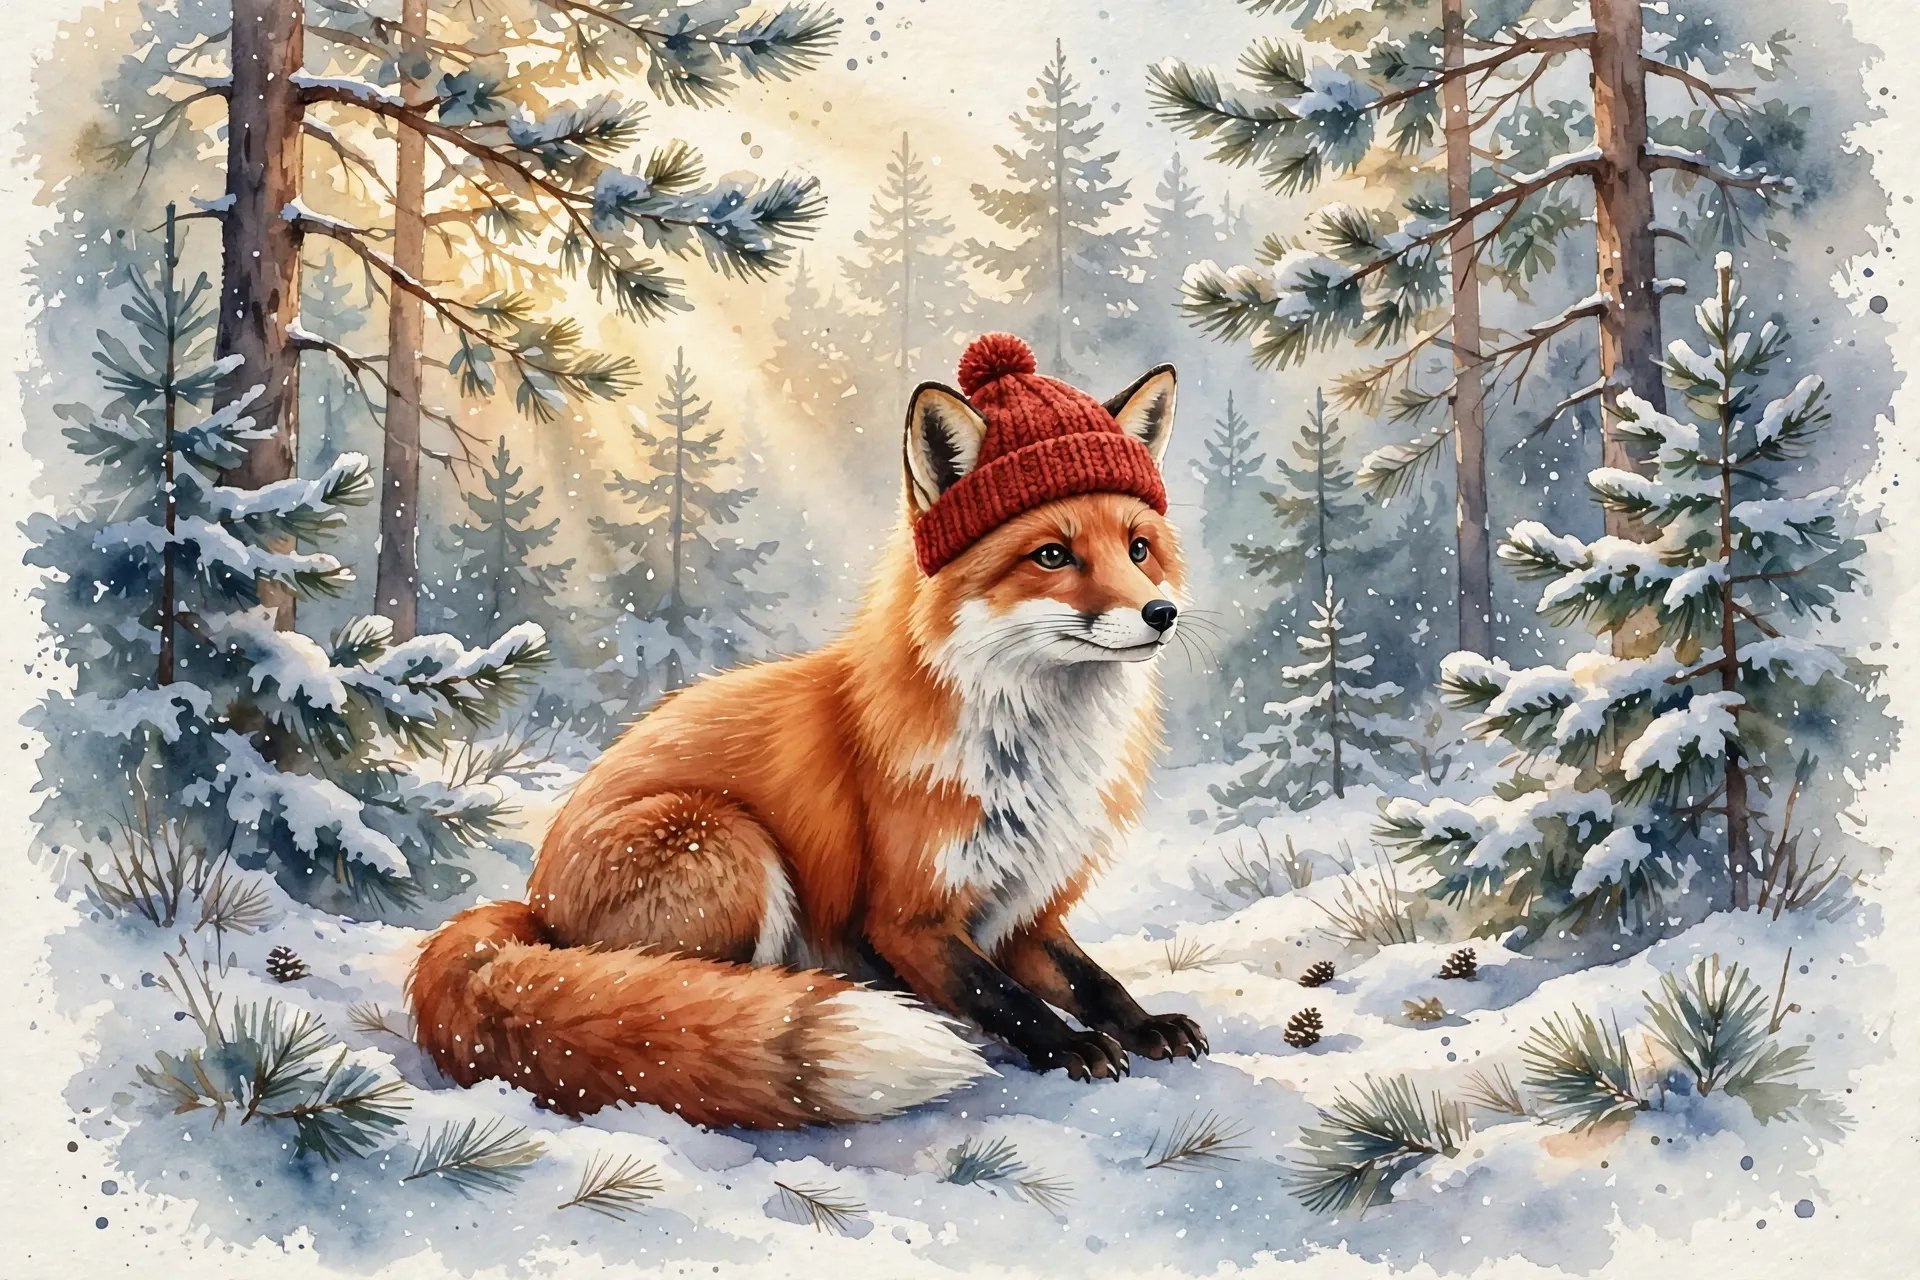
The edit primitive takes an existing image plus an instruction and returns a new image with changes scoped to what you asked for, leaving the rest intact. Reach for it when the input already exists and you want a targeted change rather than a fresh render. With the OpenAI SDK, pass the image bytes as image, exactly like OpenAI's images.edit. The example adds a red wool hat to the fox:
pythonwith open("fox.webp", "rb") as image:response = client.images.edit(model="muse-image-1.0",prompt="add a small red wool hat on the fox's head, keep the snowy forest background",image=image,n=1,)save_image(response.data[0].b64_json, "fox_hat.webp")
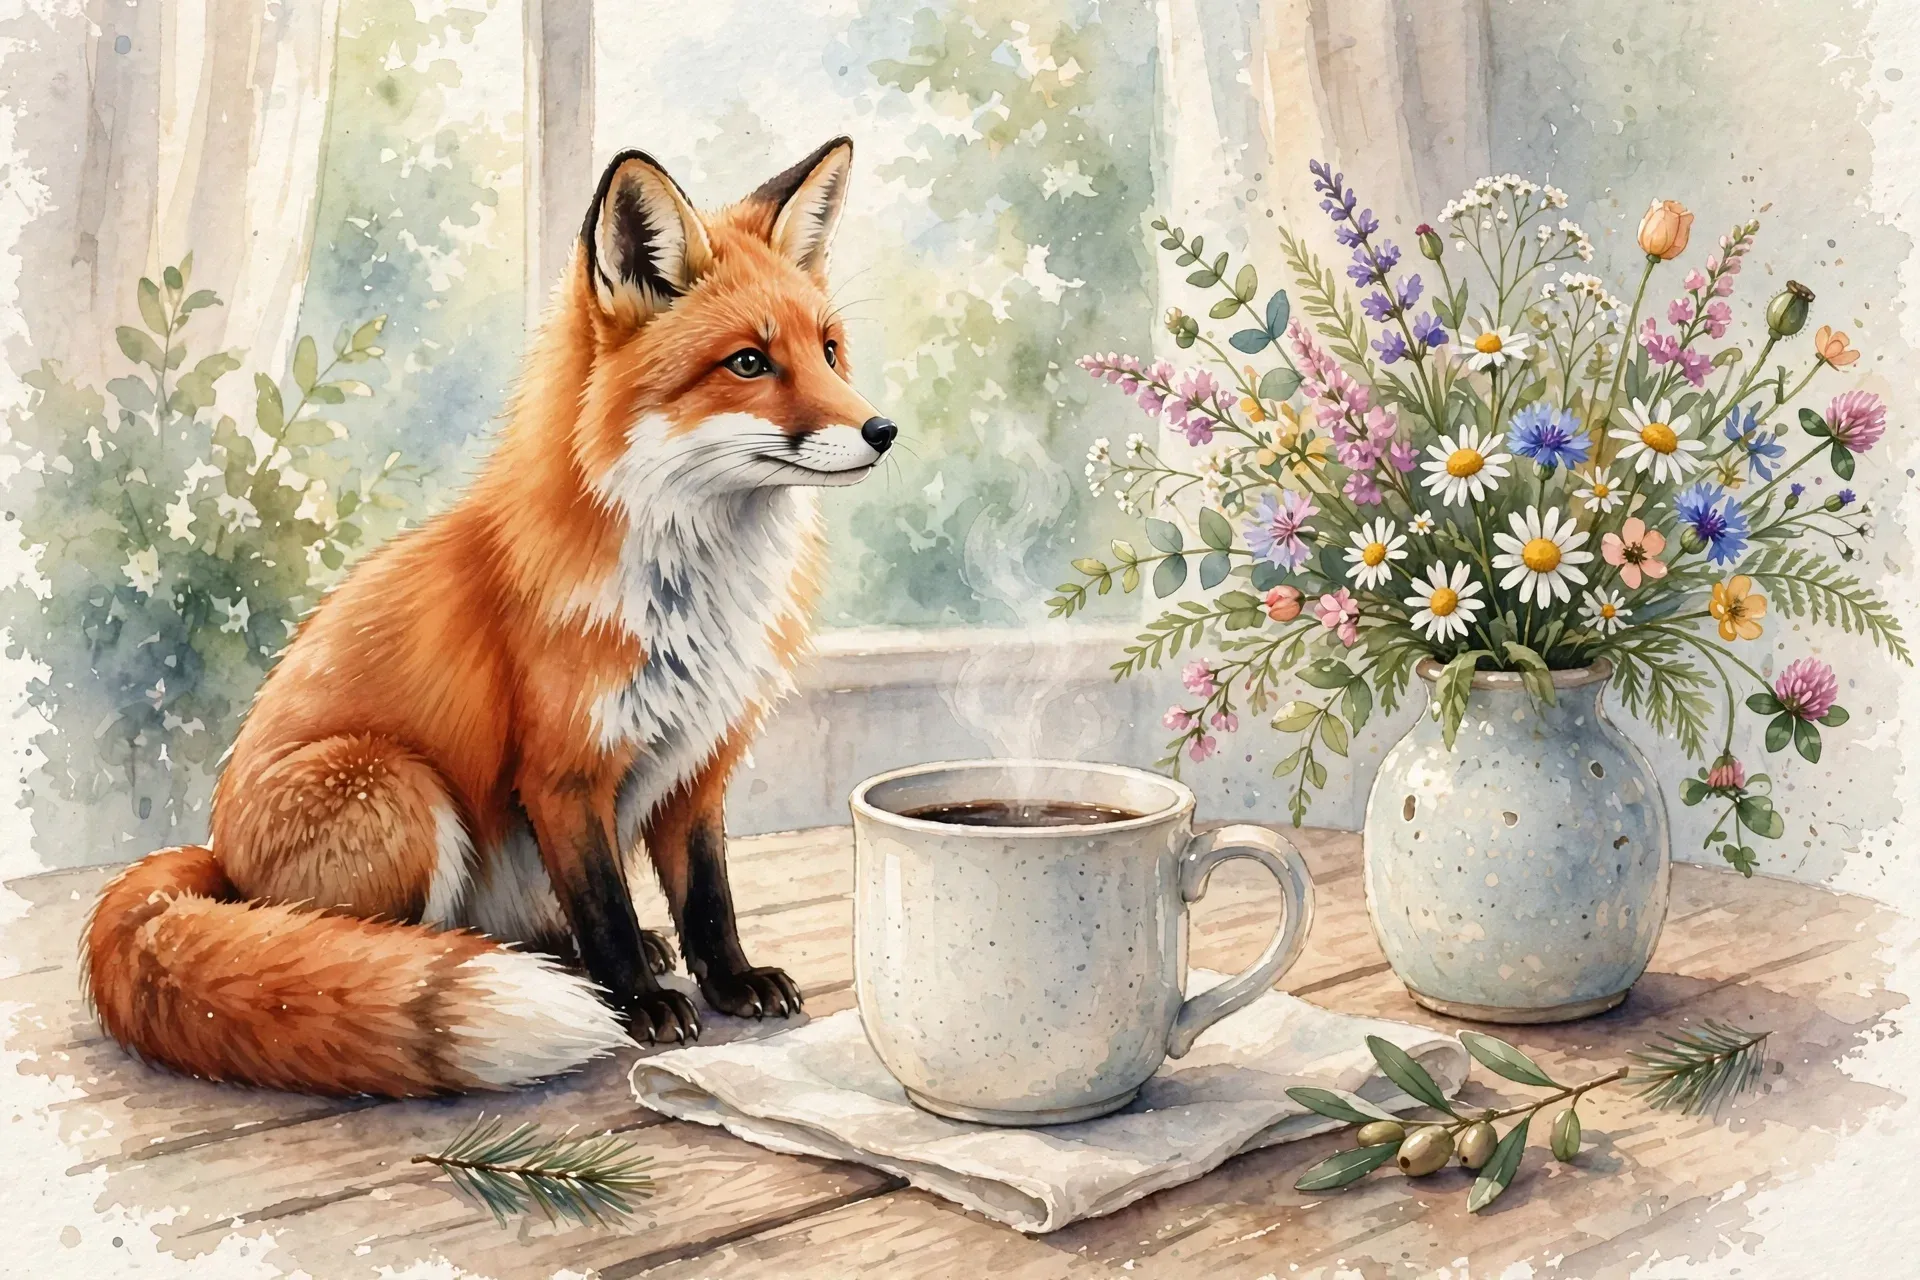
Composing is just editing with more than one input. Pass several images and the model blends them into one scene, dropping a subject from one image into the setting of another, say. It's useful when your app already has the pieces and you want them together in a single shot. Below we'll combine three inputs: the fox from earlier, a mug and a vase of flowers.
With the OpenAI SDK, pass a list of files as image:
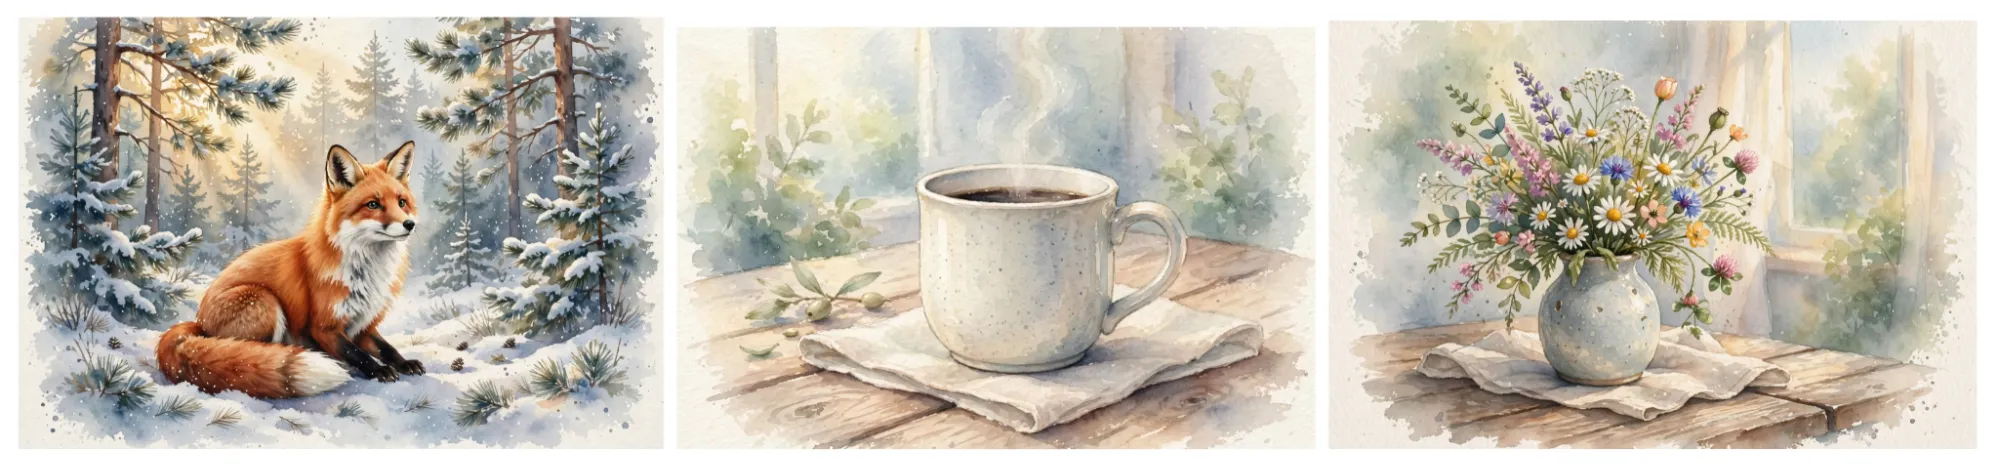
pythonwith open("fox.webp", "rb") as fox, open("mug.webp", "rb") as mug, open("vase.webp", "rb") as vase:response = client.images.edit(model="muse-image-1.0",prompt=("place the watercolor fox on a wooden table next to the ceramic ""coffee mug, with the vase of flowers standing beside the mug"),image=[fox, mug, vase],)save_image(response.data[0].b64_json, "fox_mug_vase.webp")
Full walkthrough: Cookbook – Generate, edit and compose
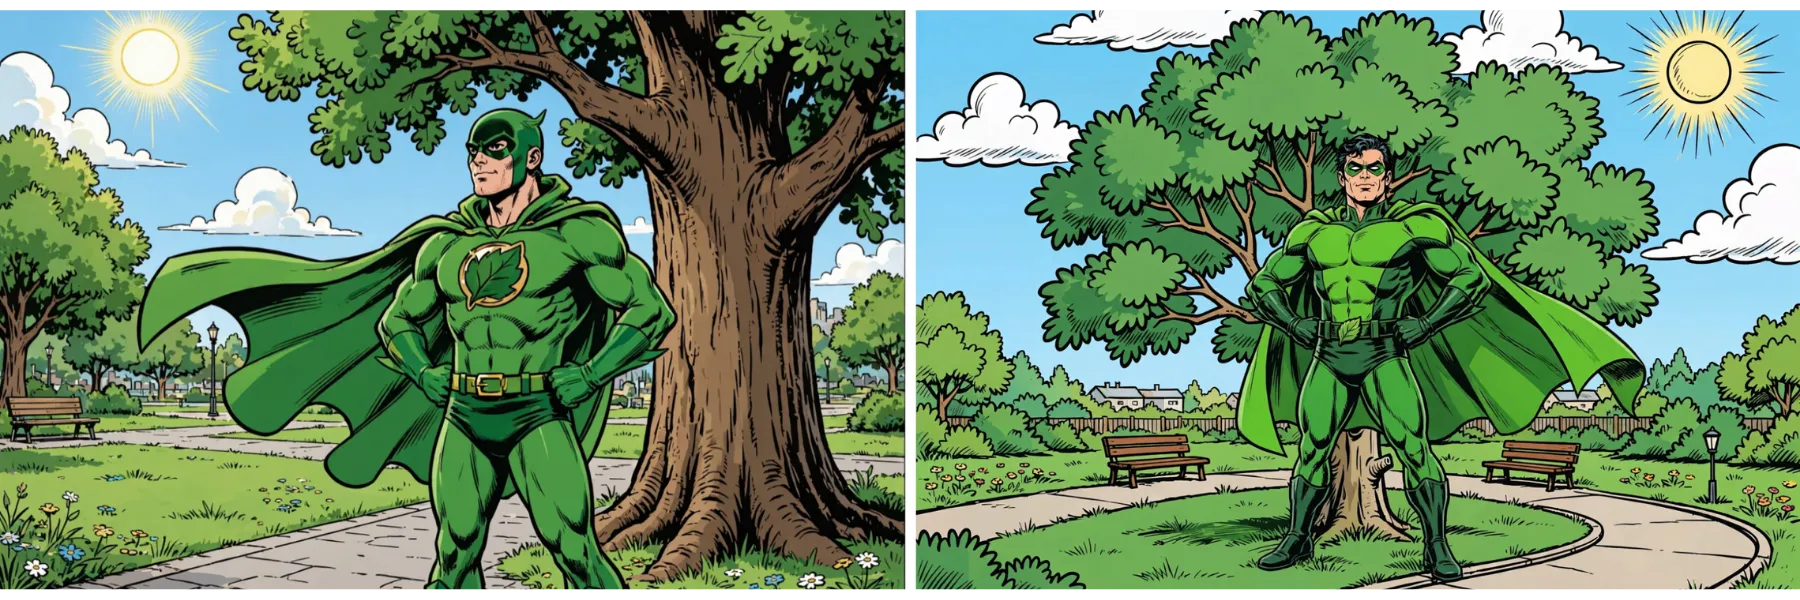
Text-to-image treats every call independently. Ask twice for "a green caped hero in a park" and you get two different heroes: the costume, the face, and the art style all drift. If your product renders a series – a character across panels, an avatar across poses, one product across scenes – that drift is the problem to solve.
The fix is to build a small set of reference images once, then pass them back in on every render. Muse Image uses them as a guide so the subject stays consistent from one image to the next.
Start by generating the anchor images with text-to-image.
The prompt below creates a character reference sheet on a plain white background so the model has a well-defined target to lock onto.
pythoncharacters = {"hero.webp": ("an original comic-book superhero character sheet, a stylized human ""man wearing a bright green flowing cape and a green eye mask, dark ""hair, confident heroic pose, bold clean comic-book line art with ""thick black outlines, flat vivid colors, plain white background, ""full body centered"),}for path, prompt in characters.items():response = client.images.generate(model="muse-image-1.0", prompt=prompt, n=1)save_image(response.data[0].b64_json, path)print(path, "usage:", response.usage)
Then build the two location plates the same way. Prompt for the setting only, no characters, so each background is a clean plate to drop the hero into:
pythonbackgrounds = {"bg_city.webp": ("comic-book style background illustration of an ordinary city street ""on a bright day, sidewalks, storefronts, lamp posts, no characters, ""no people, bold clean comic-book line art with thick black outlines, ""flat colors"),}for path, prompt in backgrounds.items():response = client.images.generate(model="muse-image-1.0", prompt=prompt, n=1)save_image(response.data[0].b64_json, path)print(path, "usage:", response.usage)
You now have two reusable anchors: the hero character sheet and the city location plate. That is the whole reference set this comic draws on.
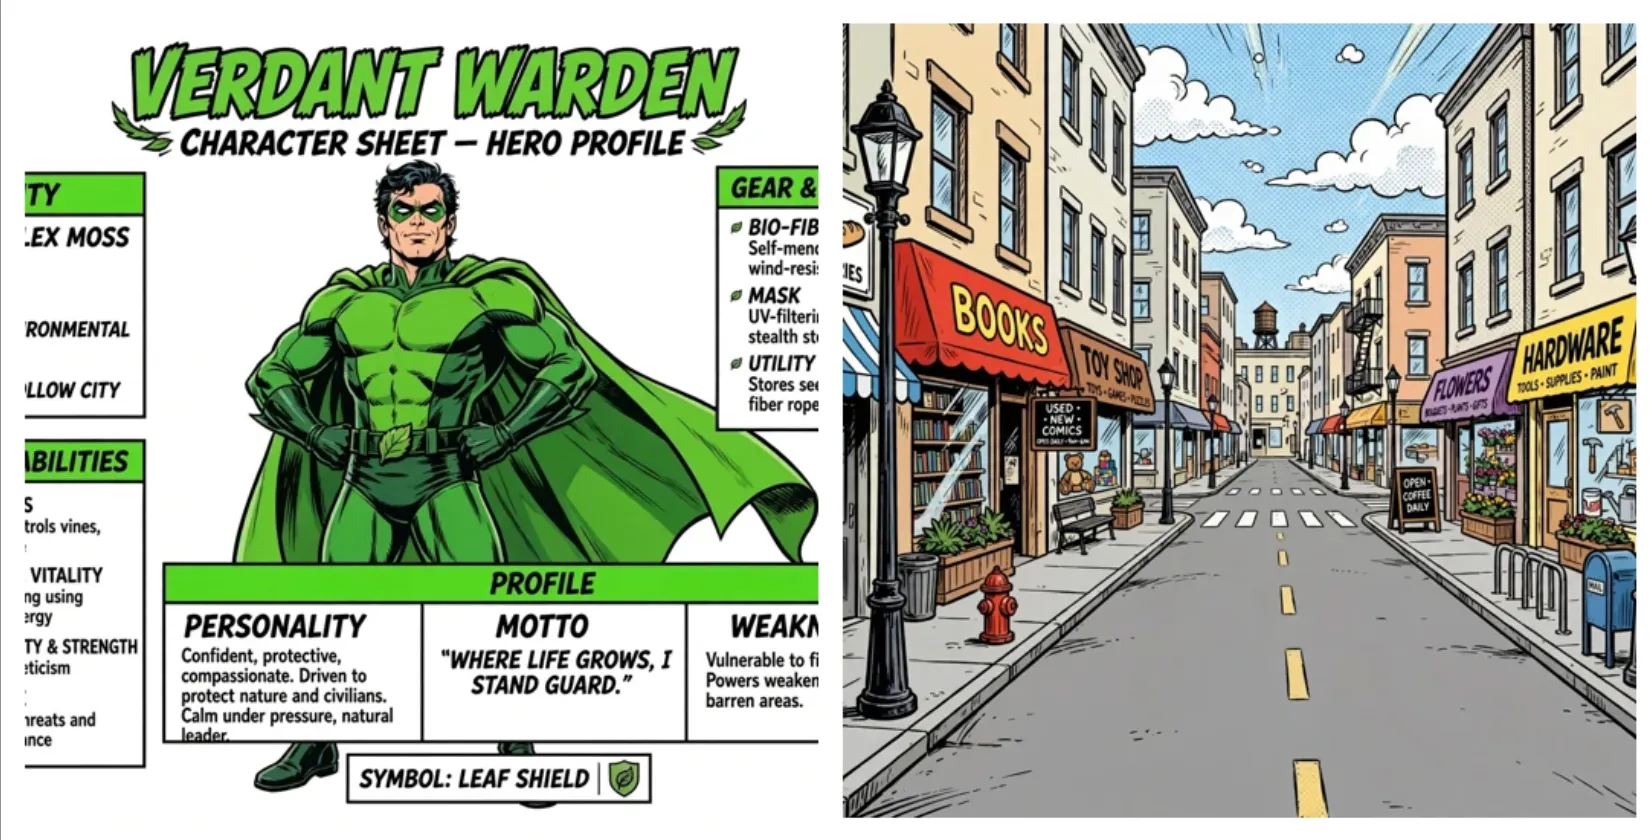
From there, you'll want to render each panel with images.edit, passing a list of reference images (the hero plus the relevant background) as image and a prompt that describes the action. Because the anchors condition the render, the same hero acts in the same locations. Keep the art-style words and a short "same subject" phrase in every prompt so panels match visually.
Two extra techniques give the page life:
size argument sets the panel's aspect ratio (the server reduces it to a ratio, not exact pixels). Use a tall ratio for a dramatic vertical shot, a square for a tight close-up, and the wide native ratio for establishing panels. Varied shapes read as a real comic page instead of a uniform grid.pythonSTYLE = ("bold clean comic-book line art with thick black outlines, flat vivid ""colors, single comic panel")HERO = ("the same original superhero from the first reference character sheet, a ""man with a bright green flowing cape and green eye mask, dark hair, keep ""his exact costume, face, and hair identical")BUBBLE = ("include a clean white comic speech bubble with a bold black outline and ""short legible uppercase comic lettering that reads exactly")panels = [# (refs, prompt, output, size). size sets the aspect ratio.(["hero.webp", "bg_city.webp"],f"{HERO}, walking down the ordinary city street shown in the second "f"reference, relaxed confident stride, {STYLE}","panel_city.webp","1536x1024",),(["hero.webp", "bg_city.webp"],"close-up of a coffee shop storefront on the city street shown in the ""second reference: the frightened coffee shop owner in an apron points "f"urgently to the right, {HERO} turning to look, {BUBBLE} "f'"HELP! A CAT\'S STUCK!", {STYLE}',"panel_store.webp","1536x1024",),]for refs, prompt, out, size in panels:files = [open(p, "rb") for p in refs]try:response = client.images.edit(model="muse-image-1.0",prompt=prompt,image=files,size=size,n=1,)finally:for f in files:f.close()save_image(response.data[0].b64_json, out)print(out, "usage:", response.usage)
The hero's costume, mask, face, and background hold across the panels because every call is anchored on the reference images.
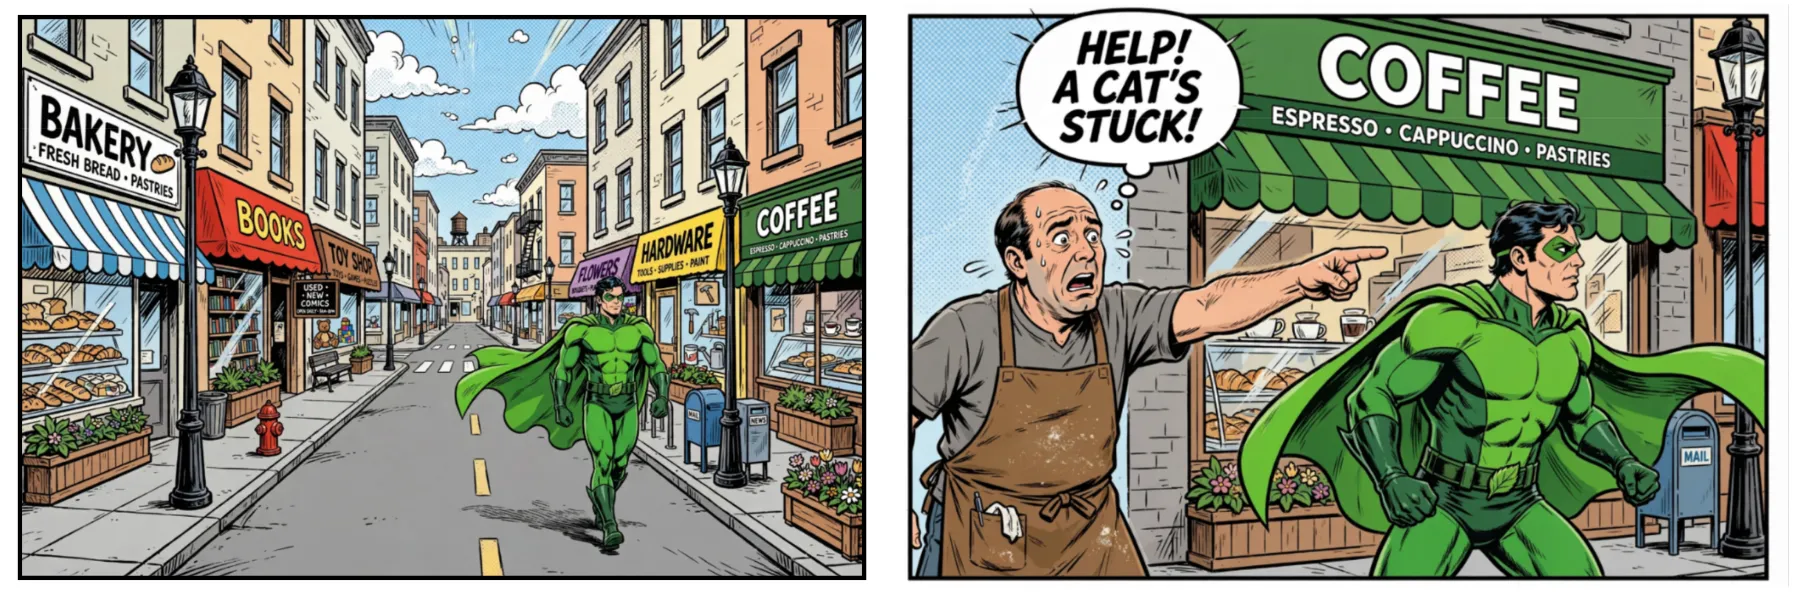
Four things make the difference between a series that holds and one that drifts:
Full walkthrough: Cookbook – Anchored composition
As we mentioned earlier, Muse Image can understand what is in an image and reasons over a multi-part instruction before it draws.
This recipe shows you this capability using a resale listing example, a pattern that carries straight over to catalog automation, listing tools and e-commerce operations. You start from a few item photos, compose them into one for-sale layout, split a multi-item photo into individual product shots and revise the listing after a sale.
Every step is a single call to the edit endpoint: pass the images and one instruction, the model then reads the frame and splits, labels or revises the parts you name.
Start with one photo per item to sell, each shot on the floor with a bit of room around it. In real use this recipe would combine pictures of real objects taken with a phone; for this recipe we've pre-generated three example pictures that stand in for those phone photos: a desk lamp, an acoustic guitar, and a stack of books.
Save the three files as item1.webp, item2.webp, and item3.webp. Any photos work: a casual shot with the item on the floor and a bit of room around it is all the model needs.
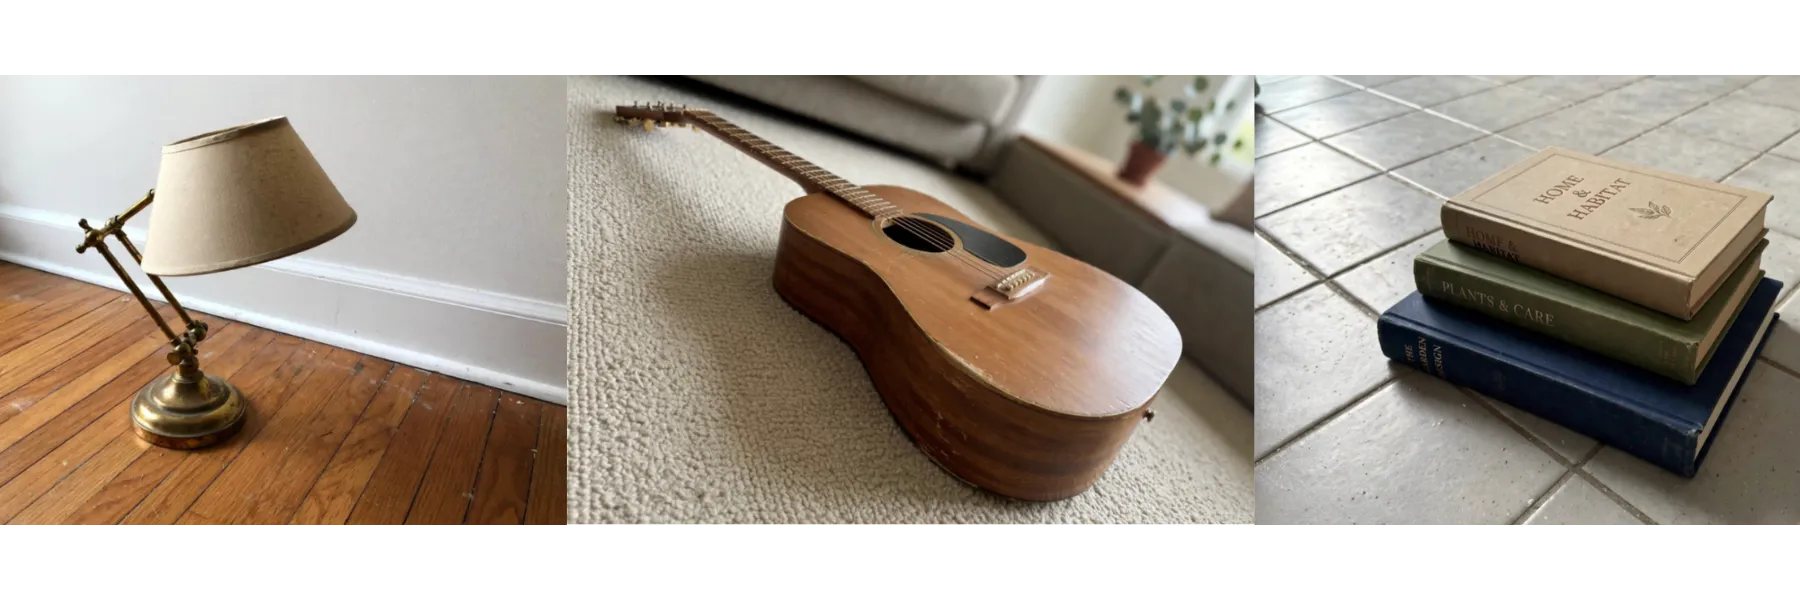
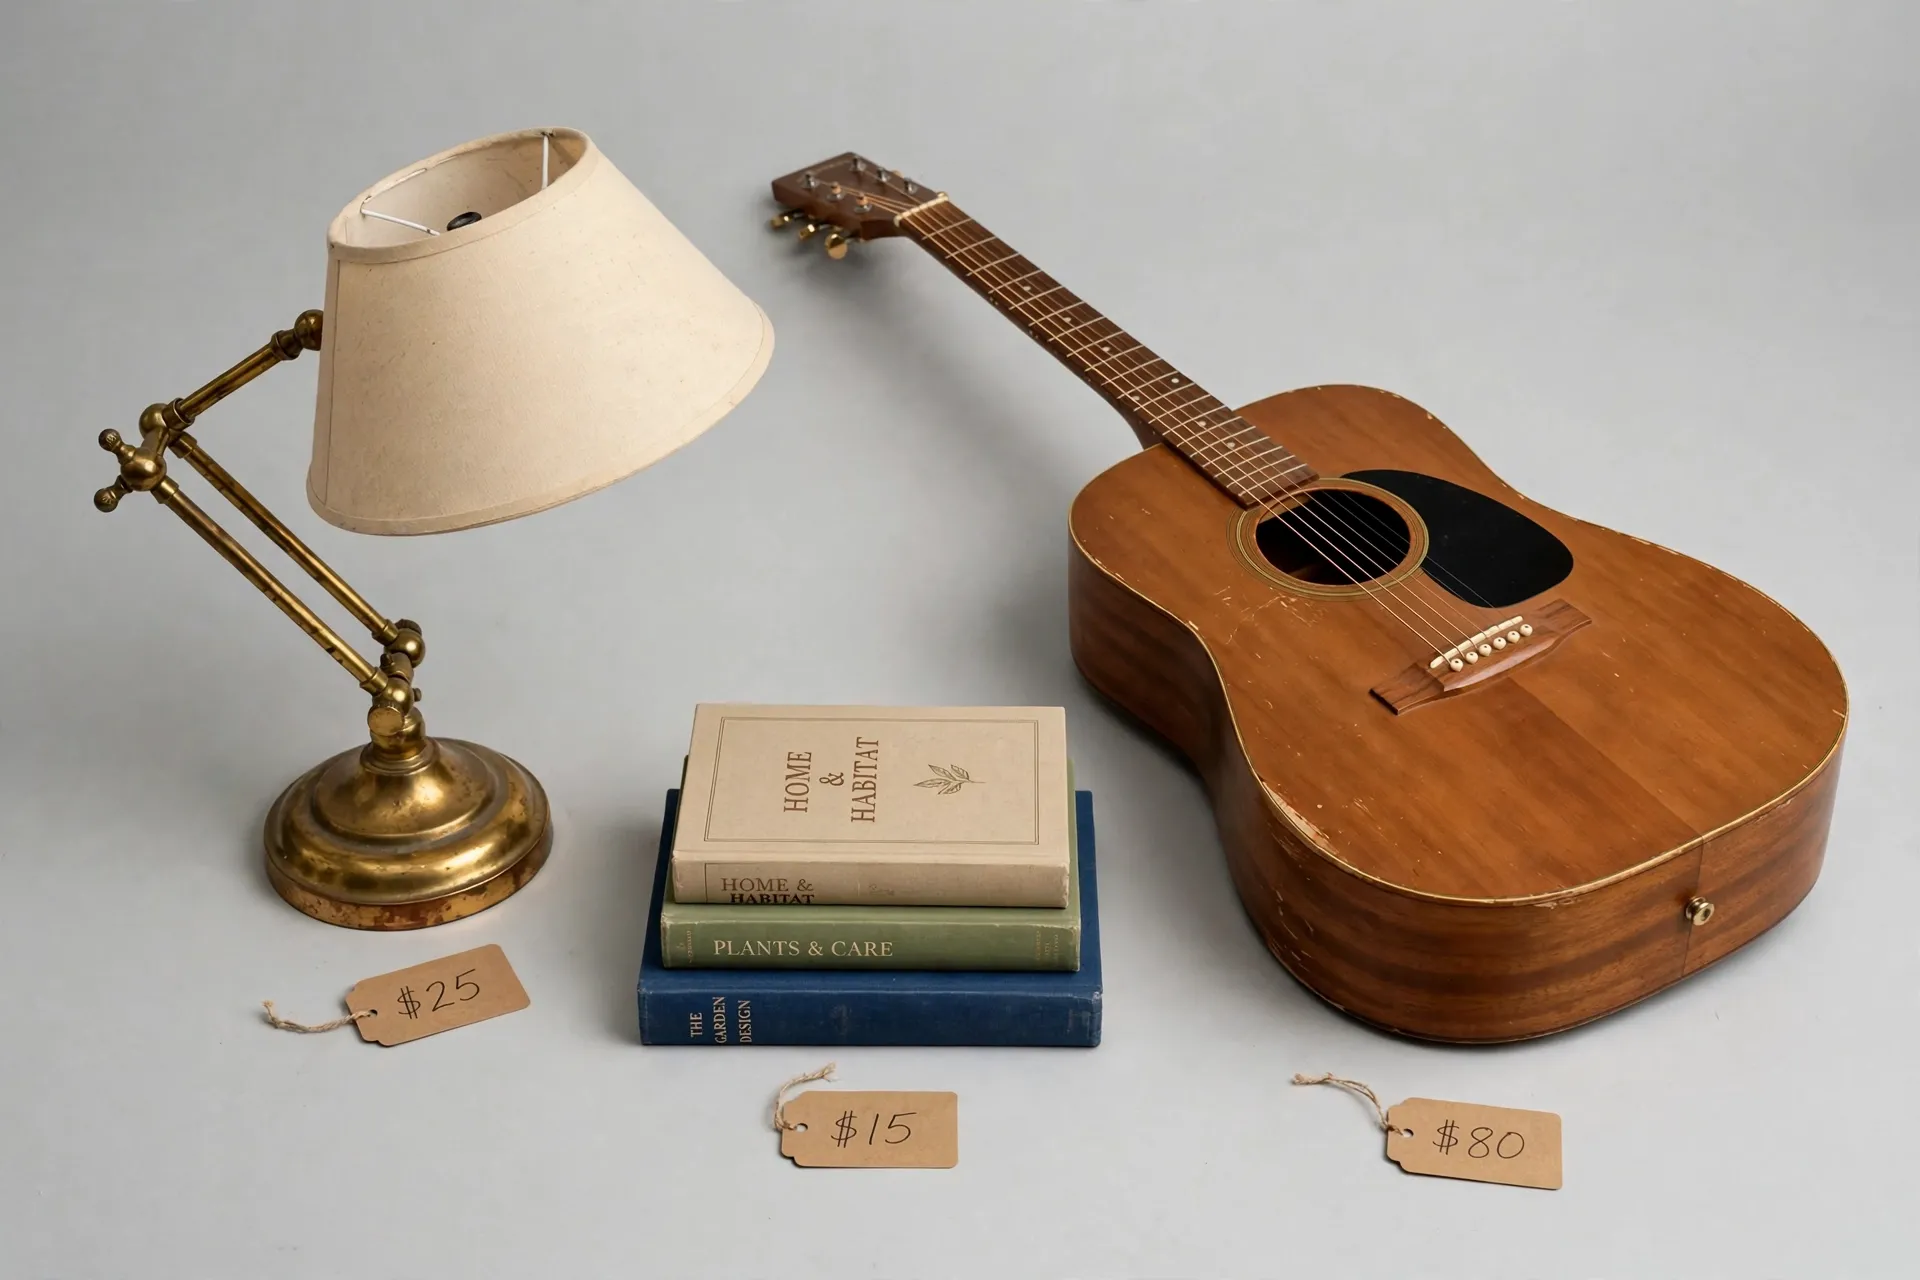
Pass all three photos to images.edit in one call with a single instruction. The model plans the layout first, then renders every item into one grid with a price under each. With the OpenAI SDK, pass a list of files as image:
pythonwith open("item1.webp", "rb") as lamp, open("item2.webp", "rb") as guitar, open("item3.webp", "rb") as books:response = client.images.edit(model="muse-image-1.0",prompt=("arrange these three items together as a tidy for-sale product ""layout on a clean neutral studio background, evenly spaced so ""each is clearly visible, with a small handwritten price tag next ""to each item; label the lamp $25, the guitar $80, and the ""books $15"),image=[lamp, guitar, books],)save_image(response.data[0].b64_json, "for_sale_grid.webp")print("usage:", response.usage)
The prices in the prompt are plain text you want drawn in the image; they are labels, not a pricing feature so the model reads them as part of the layout instruction.
Pairing each price with its item (lamp $25, guitar $80, books $15) removes any ambiguity about which number goes where, so the right price lands next to the right item. Change the wording to move the labels, add a title, or shift the arrangement.
But as all store owners know, real listings are not static. You often start from one busy photo, tag the items, and later the listing changes: one thing sells and another drops in price. In this example, we'll start from one photo with several items in it.
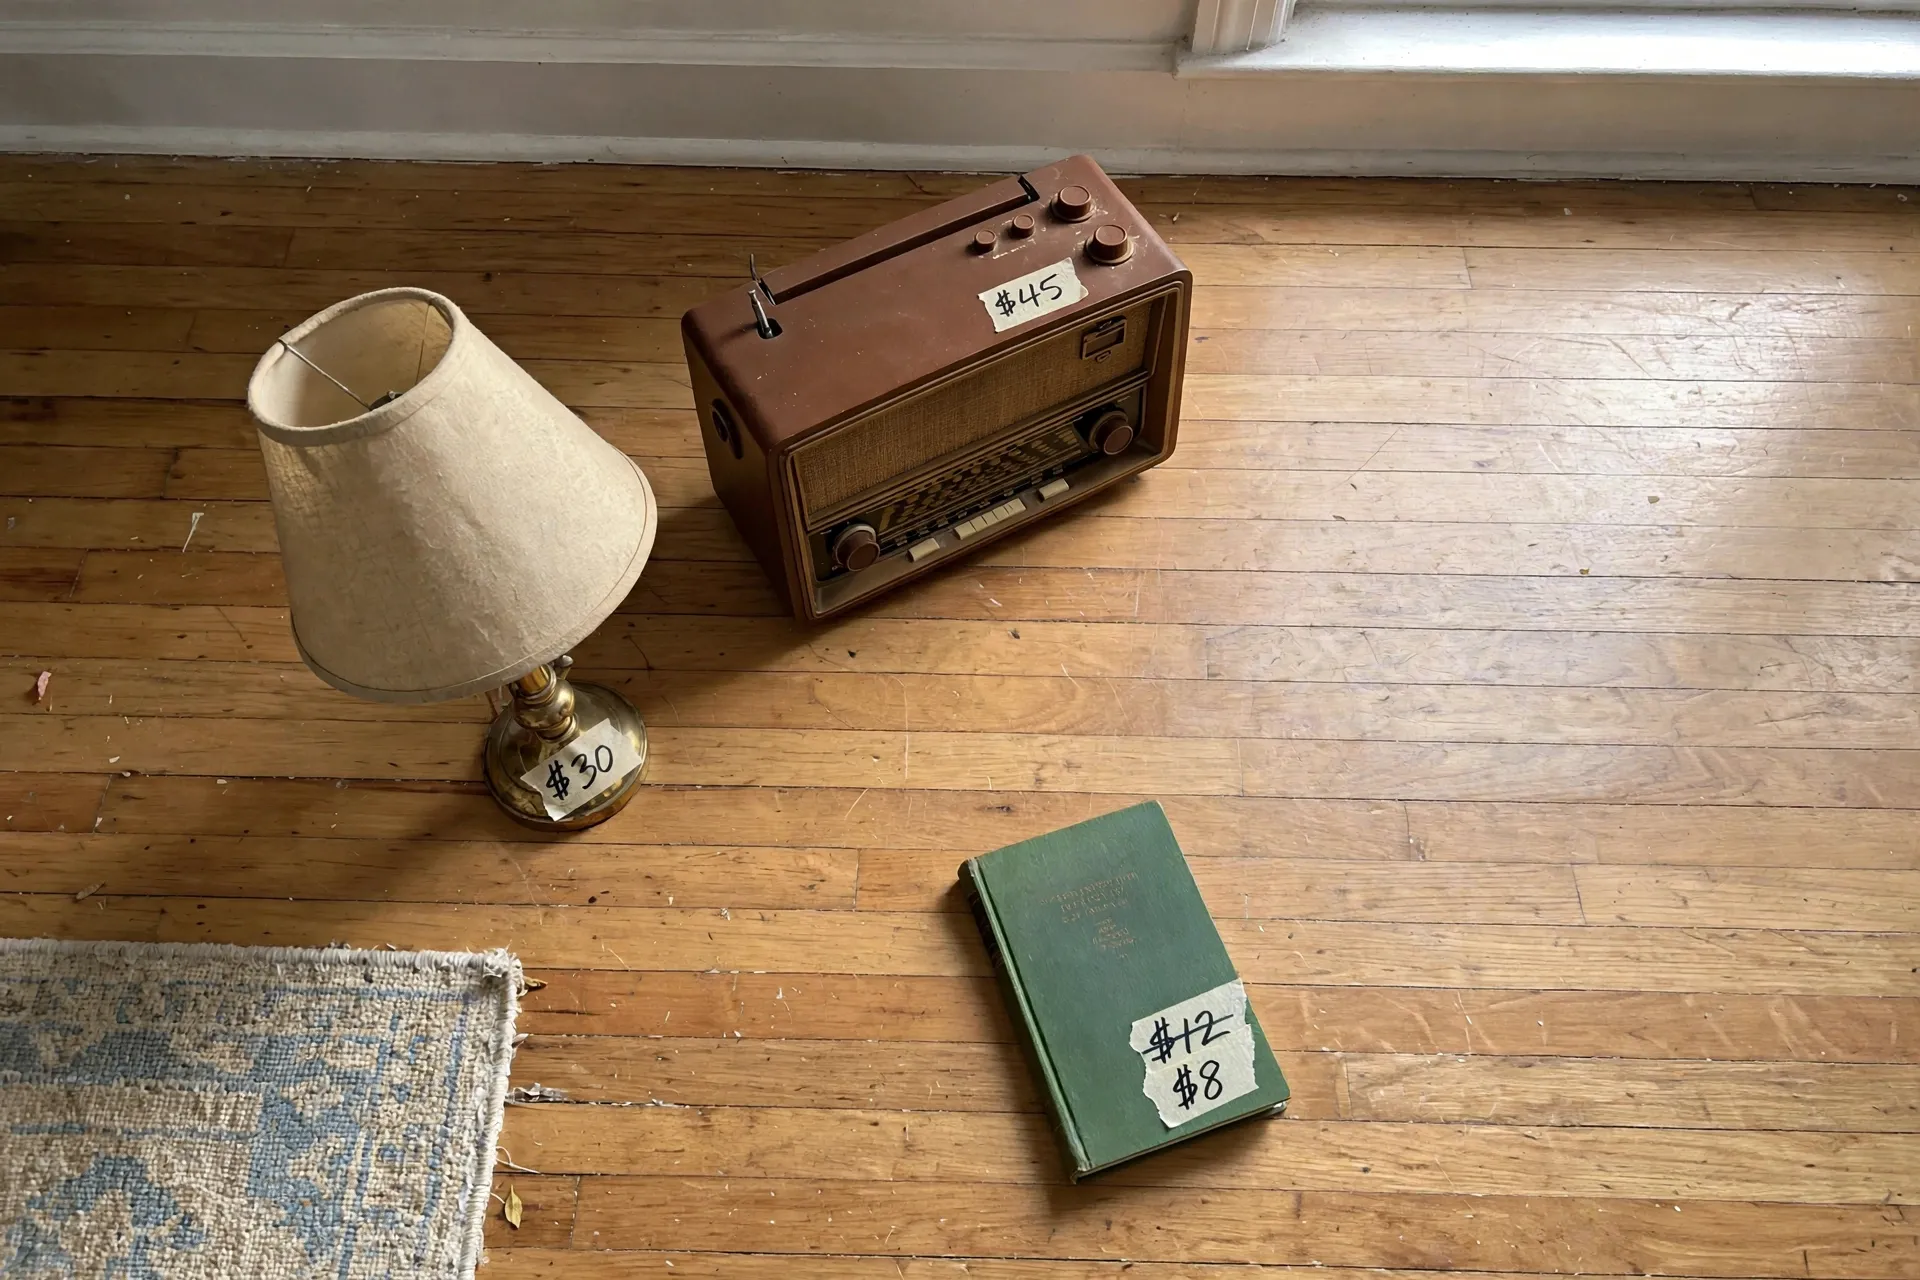
You post the listing online and a day later the boots have sold and you've dropped the book's price. Both are edits to the tagged photo and, as you can see below, one instruction can remove the sold item and mark the reduced price at the same time.
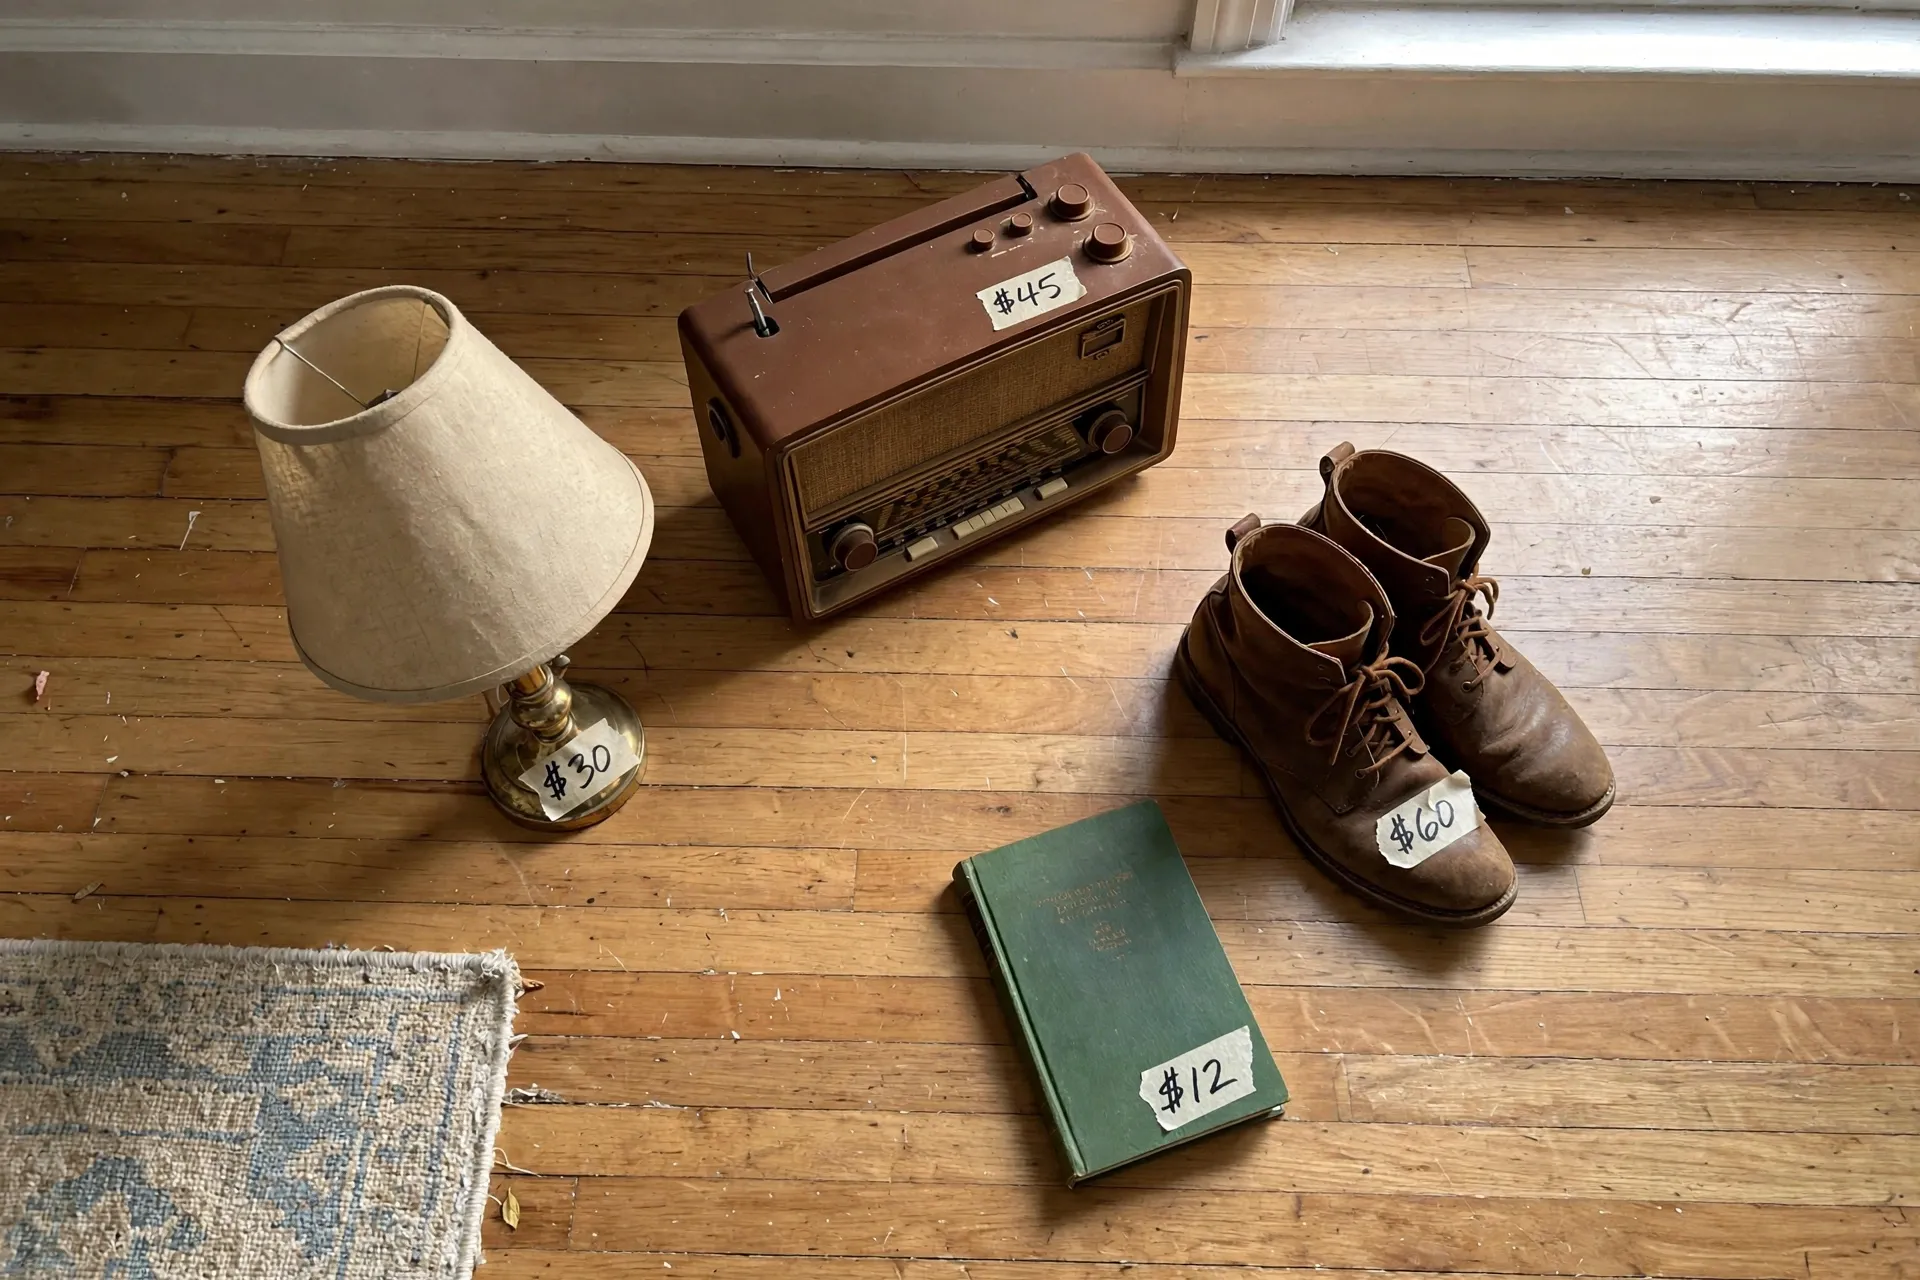
pythonwith open("tagged.webp", "rb") as listing:response = client.images.edit(model="muse-image-1.0",prompt=("the leather boots have been sold: remove the boots entirely, ""leaving that spot as empty bare floor. the book's price has ""dropped: change its tape tag to show the old price $12 with a ""line struck through it and the new price $8 next to it. keep the ""lamp's $30 tag and the radio's $45 tag as they are"),image=listing,)save_image(response.data[0].b64_json, "updated.webp")print("usage:", response.usage)
In the image below, the struck-through old price and the new one are text the model takes from your instructions. Text rendering can vary slightly from run to run, so if a price or strikethrough comes out unclear just try rerunning the call again.
If you already have an OpenAI client, you are just one base_url change away from generating your first image; if not, the Muse Image cookbook walks you through setup and your first generation and edit, so you can get started quickly.
Once you have the basics running, pick whichever of the two patterns is closer to your product: reference anchoring if you want to render a series or reasoning edits if you work with structured images. At $0.01 per image, you can experiment and see for yourself how Muse Image can help you build creative features faster.
Get started with the cookbooks below now and check out the image generation guide once you're ready to dive deeper.
We can't wait to see what you build — issues and pull requests are open on the cookbook.
Full walkthrough: Cookbook – Reasoning-driven edits